About Me
Michael Zucchi
B.E. (Comp. Sys. Eng.)
also known as Zed
to his mates & enemies!
< notzed at gmail >
< fosstodon.org/@notzed >

JavaFX Slideshow
Just to play with JavaFX and to put it through it's paces I wrote a simple slide-show thing.
For a change of pace, i'll just paste the whole source code here.
Update: I noticed stack overflow was linking here, ... and that the code was broken because it was broken and also the final release of Java8 stopped ignoring null pointers in animations so it was broken again. I've fixed the code. Note that it still has the source location hard-coded to my home directory so that needs editing (ScannerLoader).
package au.notzed.slidez;

// this code is public domain

// This is not meant to be wonderful exemplary code, it was just
// my first experiment with JavaFX animations.

import java.io.IOException;
import java.nio.file.FileVisitResult;
import java.nio.file.FileVisitor;
import java.nio.file.Files;
import java.nio.file.Path;
import java.nio.file.Paths;
import java.nio.file.attribute.BasicFileAttributes;
import java.util.concurrent.ArrayBlockingQueue;
import java.util.concurrent.BlockingQueue;
import java.util.logging.Level;
import java.util.logging.Logger;
import javafx.animation.FadeTransition;
import javafx.animation.Interpolator;
import javafx.animation.ParallelTransition;
import javafx.animation.PauseTransition;
import javafx.animation.ScaleTransition;
import javafx.animation.SequentialTransition;
import javafx.application.Application;
import javafx.collections.ObservableList;
import javafx.event.ActionEvent;
import javafx.event.EventHandler;
import javafx.scene.Node;
import javafx.scene.Scene;
import javafx.scene.image.Image;
import javafx.scene.image.ImageView;
import javafx.scene.layout.StackPane;
import javafx.stage.Stage;
import javafx.util.Duration;

/**
 * Simple slide show with transition effects.
 */
public class SlideZ extends Application {

    StackPane root;
    ImageView current;
    ImageView next;
    int width = 720;
    int height = 580;

    @Override
    public void start(Stage primaryStage) {
        root = new StackPane();

        root.setStyle("-fx-background-color: #000000;");

        Scene scene = new Scene(root, width, height);

        primaryStage.setTitle("Photos");
        primaryStage.setScene(scene);
        primaryStage.show();

        // Start worker thread, and kick off first fade in.
        loader = new ScannerLoader();
        loader.start();
        Image image = getNextImage();

        if (image != null)
            startImage(image);
    }
    ScannerLoader loader;

    public void startImage(Image image) {
        ObservableList<Node> c = root.getChildren();

        if (current != null)
            c.remove(current);

        current = next;
        next = null;

        // Create fade-in for new image.
        next = new ImageView(image);

        next.setFitHeight(height);
        next.setFitHeight(width);
        next.setPreserveRatio(true);
        next.setOpacity(0);

        c.add(next);

        FadeTransition fadein = new FadeTransition(Duration.seconds(1), next);

        fadein.setFromValue(0);
        fadein.setToValue(1);

        PauseTransition delay = new PauseTransition(Duration.seconds(1));
        SequentialTransition st;
        if (current != null) {
            ScaleTransition dropout;

            dropout = new ScaleTransition(Duration.seconds(1), current);
            dropout.setInterpolator(Interpolator.EASE_OUT);
            dropout.setFromX(1);
            dropout.setFromY(1);
            dropout.setToX(0.75);
            dropout.setToY(0.75);
            st = new SequentialTransition(
                new ParallelTransition(fadein, dropout), delay);
        } else {
            st = new SequentialTransition(
                fadein, delay);
        }

        st.setOnFinished(new EventHandler<ActionEvent>() {
            @Override
            public void handle(ActionEvent t) {
                Image image = getNextImage();

                if (image != null)
                    startImage(image);
            }
        });

        st.playFromStart();
    }

    @Override
    public void stop() throws Exception {
        loader.interrupt();
        loader.join();
        super.stop();
    }

    public static void main(String[] args) {
        launch(args);
    }
    BlockingQueue<Image> images = new ArrayBlockingQueue(5);

    Image getNextImage() {
        if (loader.complete) {
            return images.poll();
        }
        try {
            return images.take();
        } catch (InterruptedException ex) {
            Logger.getLogger(SlideZ.class.getName()).log(Level.SEVERE, null, ex);
        }
        return null;
    }

    /**
     * Scans directories and loads images one at a time.
     */
    class ScannerLoader extends Thread implements FileVisitor<Path> {

        // Directory to start scanning for pics
        String root = "/home/notzed/Pictures";
        boolean complete;

        @Override
        public void run() {
            System.out.println("scanning");
            try {
                Files.walkFileTree(Paths.get(root), this);
                System.out.println("complete");
            } catch (IOException ex) {
                Logger.getLogger(SlideZ.class.getName())
                    .log(Level.SEVERE, null, ex);
            } finally {
                complete = true;
            }
        }

        @Override
        public FileVisitResult preVisitDirectory(Path t, BasicFileAttributes bfa)
            throws IOException {
            return FileVisitResult.CONTINUE;
        }

        @Override
        public FileVisitResult visitFile(Path t, BasicFileAttributes bfa)
            throws IOException {
            try {
                Image image = new Image(t.toUri().toString(),
                    width, height, true, true, false);

                if (!image.isError()) {
                    images.put(image);
                }
            } catch (InterruptedException ex) {
                Logger.getLogger(SlideZ.class.getName())
                    .log(Level.SEVERE, null, ex);
                return FileVisitResult.TERMINATE;
            }
            return FileVisitResult.CONTINUE;
        }

        @Override
        public FileVisitResult visitFileFailed(Path t, IOException ioe)
            throws IOException {
            return FileVisitResult.CONTINUE;
        }

        @Override
        public FileVisitResult postVisitDirectory(Path t, IOException ioe)
            throws IOException {
            return FileVisitResult.CONTINUE;
        }
    }
}
The only 'tricky bit', if you could call it that, is the use of the Java 7 FileVistitor and a thread to load the files incrementally and asynchronously. Rather than try to make assumptions about the filename I just attempt to load every file I find and let the Image object tell me if it was valid or not.
But the JavaFX bit is pretty simple and straightforward, and i'm looking forward to playing with it further. It's given me a few ideas to try when I have some time and the weather isn't so nice as it is this weekend.
I'm not sure if the rendering pipeline is completely `GPU accelerated' yet on AMD hardware - the docs only mention that '3D' is only on NVidia so far.
If it isn't then the performance is ok enough - the CPU on this box is certainly capable of better mind you.
If it is, then it needs a bit more work. It can keep up ok with the simple fade and scale transitions i'm using at 580p, but adding a blur drops it right down, and trying to run it 1920x1200 results in a pretty slow frame-rate and lots of tearing.
Every JavaFX application also crashes with a hot-spot backtrace when they finish.
But the "main" problem with learning more JavaFX at this point for me is that it's going to make it more painful to maintain any Swing code I have, and it will make Android feel even more funky than it does already.
Update: So i've confirmed the GPU pipeline is not being used on my system. Bummer I guess, but at least the performance i'm getting is ok then.
If one sets -Dprism.verbose=true as a VM argument, it will print out which pipeline it uses.
Update 2: I found another option -Dprism.forceGPU=true which enables the the GPU pipeline on the AMD proprietary drivers I'm using. Oh, that is much better. Added a gaussian blur-in and ran it full-screen and it keeps up fine (and so it should!). There's a jira bug to enable it, so I presume it isn't too far off in the main release.
Update 3: I've done another one with a more sophisticated set of animated-tile transitions as JavaFC Slidershow 2.
JavaFX + webcam, Android n shit.
For Friday Follies I thought i'd have a look at setting up a test harness for mucking about with object detection and so on on a webcam outside of OpenCL - and for a change of pace I thought i'd try JavaFX at last - now it's included in release Java runtime for all platforms it's time I had a look.
Well, i'm not sure i'm a fan of the squashed round-cornered buttons - but it does seem nice so far. No more need to write an 'OverlayView' to draw boxes on the screen. After fighting with some arse-pain from Android for the last couple of weeks it's nice to go back to Java proper again too.
One of the big oversights in the earlier incarnations - being able to load in-memory pixmaps into the scene - has now been fixed, and the solution is simple and elegant to boot.
For example, I hooked up video 4 linux for java to display webcam output with only 1 line of code (outside the rest of the v4l4j stuff).
  writableImage.setPixels(0, 0, width, height,
      PixelFormat.getByteRgbInstance(), videoFrame.getBytes(),
      0, width);
And all I need to do is add the writableImage to the scene. (occasionally when i start the application the window doesn't refresh properly, so i'm probably missing something - but it's quite fine for testing). It would be nice to have some YUV formats, but that should be possible with the api design.
Of course, I could do something similar with Swing, but that involved poking around some internals and making some assumptions - not to mention breaking any possible acceleration - and I still had to invoke a refresh manually.
There's a new set of concurrency stuff to deal with, but at least they seem fairly straightforward.
Let Swing ... swing?
I actually quite liked Swing. It did have a lot of baggage from the awt days but it was a nice enough toolkit to write to, and almost every component was re-usable and/or sub-classable which saved a heap of development effort (now that i'm claiming it was perfect either). The first time I used it in anger i'd just come from a few years fighting with that microsoft shit (jesus, i can't even remember what it was called now, it had fx in the name/predated silverlight) and coming to a toolkit with decent documentation, fewer performance issues, fewer bugs, the ability to subclass rather than forcing you to compose, and the friggan source-code was a big relief. (Not to mention: no visual studio).
But from what little I know about it so far, JavaFX sounds pretty good and I don't think i'll be missing Swing much either. At least now they've made it a proper Java toolkit, and fixed some shortcomings. The main benefit I see is that it eschews all the nasty X and native toolkit shit and just goes straight to the close-to-hardware apis rather than having to try to hack them in after the fact (although I found Swing ok to use from a developer standpoint, I would not have enjoyed working on it's guts too much).
I'll definitely have to have more of a play with it, but so far it looks nice.
Android ...
Or rather, the shit lifecycle of an Android window ...
Until recently I just hadn't had time to investigate and implement orientation-aware applications - so all my prototypes so far were just working with a fixed orientation. Seems like an ok toolkit when used this way - sure it has some quirks but you get decent results for little effort.
But then I looked into supporting screen rotation ... oh hang on, that window object on which you were forced to write all your application code, suddenly goes away just because the user turned the phone?
Of course, the engineers at Google have come up with other solutions to work around this, but they all just add weird amounts of complication to an already complicated situation.
AsyncTask
So when I previously thought AsyncTask was a neat solution to a simple problem, I now realise it just makes things more complicated because of the lifecycle issue. Now there's some AsyncLoader mess which can be used to replace what you might've used an AsyncTask for - but with about 5x as much boiler-plate and lots of 'I don't really get what's going on here' crap to deal with as well. Most of that 'not knowing' goes away with time, but the learning curve is unnecessarily steep.
AsyncTask is simple because it's just a bit more around Runnable, saving you having to runOnGuiThread explicitly. AsyncLoader on the other hand is a whole 'lets pretend static resources are bad unless it's part of the toolkit' framework designed to separate your application from it's source code. i.e. it adds hidden magic. Hidden magic isn't abstraction, it's dumb.
You've been fragged!
Then take fragments. Go on ... please? So as if tying application logic to user windows wasn't enough, now one does the same for individual components of windows. A large part of why they exist just seems to be to be able to support orientation changes whilst preserving live objects - but it seems a pretty round-about way of doing it (they are also purportedly for supporting layout changes, but you can already do that ...).
But one of the biggests problem is the documentation. For the few times there is any, it is way out of date - when you find an official article explaining how to do something you soon find out that way was deprecated when you go to the class doco ... Obviously google are penny pinching on this one, you'd think with their resources they could do a better job to keep everything in sync - even Sun did a much better job and Oracle are probably better again.
To be honest, I think main issue I have personally with Fragments is the name itself - I kind of get what they're for, building activities from parts - but obviously all the meaningful names were taken (hell, even 'widget' means more). But the name 'fragment' just has no useful meaning in this context -
fragments are what you have left over after you've blown shit up
. Fragments are what a plate becomes after dropping one on a cement floor. Or what was left of the longneck I left too long in the freezer the other night (well, fragments and beery ice).
It is not a word of which things are constructed, it's just the mess left after some catastrophic mechanical failure.
(and the fact there are UI+logic, and logic-only 'fragments' surely does not help either)
The GoogleWay(tm)
Unfortunately, this all just forces you to code exactly the way google wants you to - which is fine when the problem suits, but it's a bit of a pain to learn just what that `way' actually is in the first place ...
In the end I just had to put everything in a database, and pass around id's to keep track of the state. Although it works there are still some complications. For example if you have a fragment which maintains its state during an orientation change, you then have to presumably code your activity to only load the state if it doesn't already have one, or fuck around with some other crap in the fragment to deal with it. I think my code just ends up reloading everything anyway, but at least it's on another thread and the user doesn't notice. If you set your object id's properly in your list adapter (now there's another 'lets mix different types of code' mess) then it mostly just works.
Once you've finally done all that ... then at least it does work out more or less, and trying to implement the 'proper' lifecycle stuff (whatever that is) becomes a whole lot easier too.
Internode Streaming Radio App
So last night I threw together a simple application for accessing my ISP's streaming radio proxies from android. Now I have a box plugged into my stereo, suddenly I find a use for such a programme.
It can be found over on a page on my Internode account. I don't have time to up the source, but if i work on other additions (which personally I don't need), i will probably create a project somewhere for it.
You'd really think playing a remote playlist was a pretty basic function - but it took less time to write this (I just made some very small changes to the RandomMusicPlayer from the samples) than to try to find one in the 'play' store that bloody worked. It's not that they were just clumsy, ugly, really slow (for no apparent reason) - I didn't get a single beep out of them either.
I actually first mucked about with JJPlayer from jjmpeg and did get it working playing music from a selected .m3u file in a browser, but I decided that was a bit too hacky and clumsy. And besides if MediaPlayer worked with the internode streams, I would just use that. They did so that's what I went with. The RandomMusicPlayer sample I started with pretty much does all the hard work - it runs as a service, works in the background (even with the Mele 'off'!!!), and so on.
I put a link to it on my internode home page - which has been sitting idle for a few years.
Note:
These streams are only available to Internode customers, a local ISP. There's no point looking at this if you're not one.
Also, I am not affiliated with Internode in any way.
But I am off to listen to some retro electronica ...
Update: I updated the app to be a bit more properer, and wrote another post about it.
Update: Moved the home page.
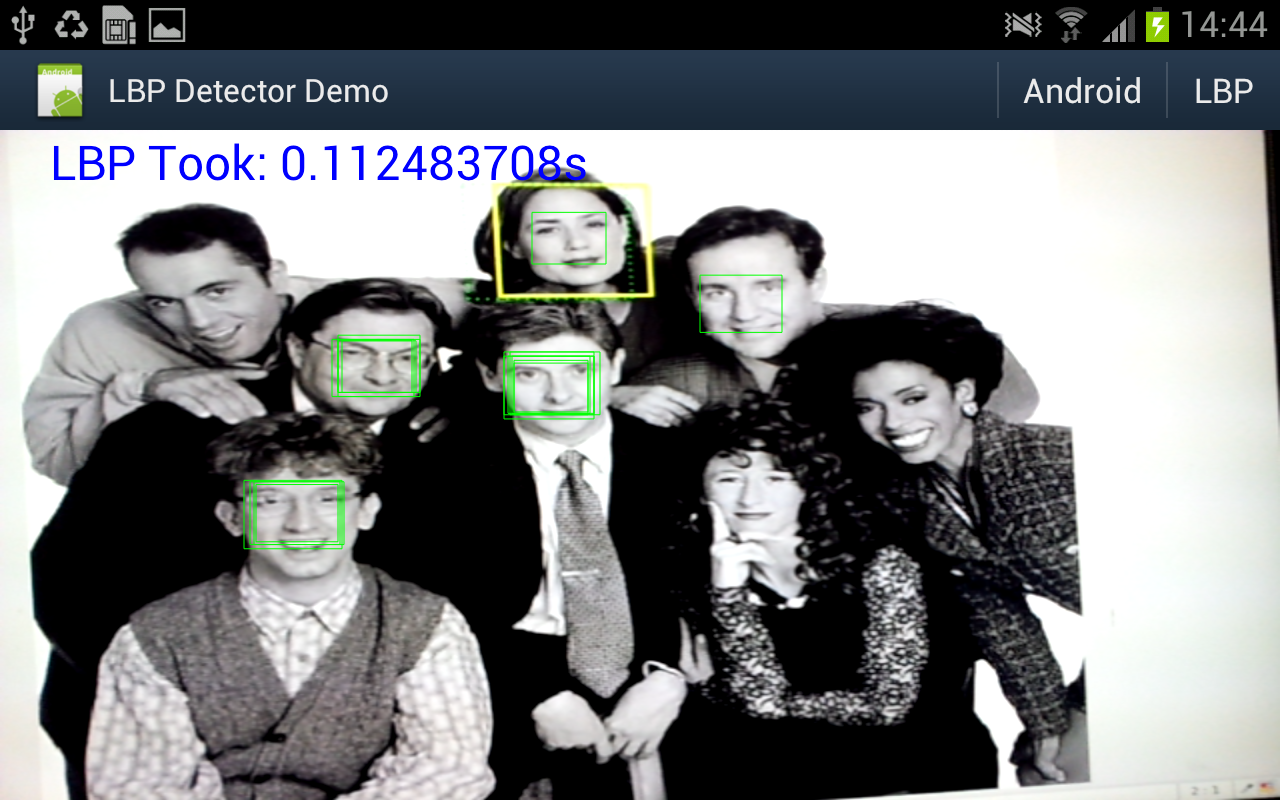
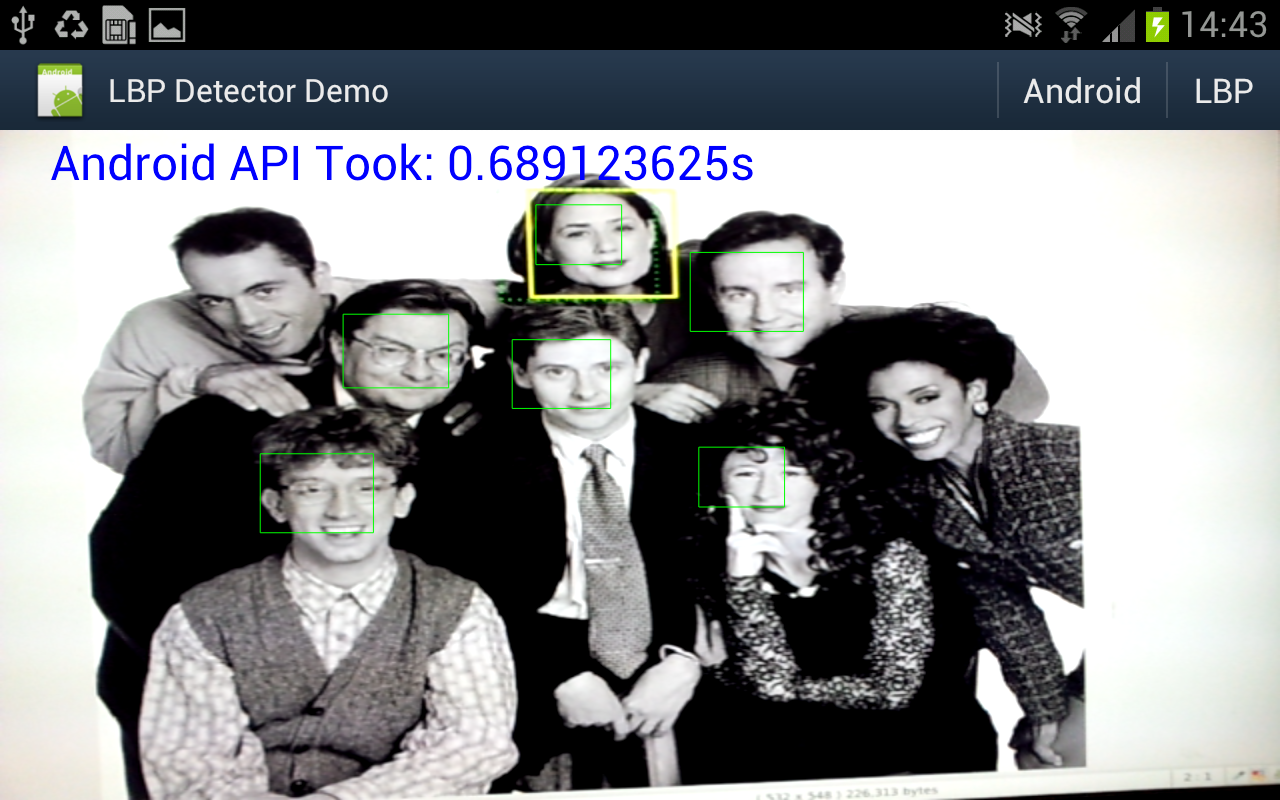
Object detector in action
Well I really wanted to see if the object detector I came up with actually works in practice, and whether all that NEONifying was worth it. Up until now i've just been looking at heat-maps from running the detector on a single still image.
So I hacked up an android demo (I did start on the beagleboard but decided it was too much work even for a cold wintry day), and after fixing some bugs and summation mathematics errors - must fix the other post, managed to get some nice results.
A bit under 10fps. And for comparison I hooked up some code to switch between my code or the android supplied one.
Well under 2fps.
I was just holding the "phone" up to a picture on my workstation monitor.
Some information on what's going on:
- Device is a Samsung Galaxy Note GT-N7000 running ICS. This one has a dual core ARM cortex A9 CPU @ 1.4Ghz.
- Input image is 640x480 from the live preview data from the Camera in NV12 format (planar y, packed uv).
- Both detectors are executing on another thread. I'm timing all the code from 'here's the pixel array' to 'thanks for the results'.
- The LBP detector is using very conservative search parameters: from 2x window (window is 17x17 pixels) to 8x window, in scale steps of 1.1x. This seems to detect a similar lower-sized limit as the android one - and the small size limit is a major factor in processing time.
- At each scale, every location is tested.
- Android requires a 565 RGB bitmap, which i create directly in Java from the Y data.
- The LBP detector is just using the Y data directly, although needs to copy it to access it from C/ASM.
- The LBP detector pipeline is mostly written in NEON ASM apart from the threshold code - but that should optimise ok from C.
- A simple C implementation of the LBP detector is around 0.8s for the same search parameters (scaling and lbp code building still uses assembly).
- The LBP detector is showing the raw thresholded hits, without grouping/post-processing/non-maximum suppression.
- The LBP code is only using a single core (as the android one also appears to)
- The LBP classifier is very specifically trained for front-on images, and the threshold chosen was somewhat arbitrary.
- The LBP classifier is barely tuned at all - it is merely trained using just the training images from the CBCL data set (no synthesised variations), plus some additional non-natural images in the negative set.
- Training the LBP classifier takes about a second on my workstation, depending on i/o.
- Despite this, the false positive rate is very good (in anecdotal testing), and can be tuned using a free threshold parameter at run-time.
- The trained classifier definition itself is just over 2KB.
- As the LBP detector is brute-force and deterministic this is the fixed-case, worst-case performance for the algorithm.
- With the aggressive NEON optimisations outlined over recent posts - the classifier itself only takes about 1 instruction per pixel.
A good 6x performance improvement is ok by me using these conservative search parameters. For example if I simply change the scale step to 1.2x, it ends up 10x faster (with still usable results). Or if I increase the minimum search size to 3x17 instead of 2x17, execution time halves. Doing both results in over 25ps. And there's still an unused core sitting idle ...
As listed above - this represents the worst-case performance. Unlike viola & jones whose execution time is dynamic based on the average depth of cascade executed.
But other more dynamic algorithms could be used to trim the execution time further - possibly significantly - such as a coarser search step, or a smaller subset/smaller scale classifier used as a 'cascaded' pruning stage. Or they could be used to improve the results - e.g. more accurate centring.
Update: Out of curiosity I tried an 8x8 detector - this executes much faster, not only because it's doing under 25% of the work at the same scale, but more to the point because it runs at smaller image sizes for the same detected object scale. I created a pretty dumb classifier using scaled versions of the CBCL face set. It isn't quite reliable enough for a detector on it's own, but it does run a lot faster.
The second golden age of personal computing.
With interest and some excitement (despite it being Nokia Nikon and having some negative experiences with them), I just read that Nokia have announce an Android powered camera. Of course, it's all ostensibly about feacebook and twatter, but one can easily see a world of more practical use to an appliance on which you can install customised software. Let's just hope that a DSLR isn't too far behind - although camera vendors may fear having the shift-ful proprietary software they took years to develop improved upon and obsoleted by someone else.
It is rather ironic that whilst desktop computer operating systems are locking down, dumb-stupifying and generally turning general purpose machines into appliances, appliance makers are opening up, complicating, and turning appliances into general purpose computers.
And at the heart of it, it's all thanks to Free Software. 'Onya RMS.
And it's no doubt also thanks to the purest form of capitalist economics. It is simply cheaper to use a free operating system than it is to write your own or purchase a per-appliance non-free one.
First Golden Age
I consider the first Golden Age of personal computers to the time before Microsoft Windows and their illegally attained `wintel' monopoly.
So these developments are clearly also a result of breaking the back of the wintel monopoly and the USA based global technology plutocracy.
Who would have thought that a bit of competition would benefit we the little people?
Second Golden Age
So I feel we're entering another 'golden age' of computing: where anybody with the skills can improve upon or replace the usually shitty software that comes with any device - as every device is now powered by substantial software components this equates to a lot of computers. With any luck I will never have to purchase a locked-down throw-away appliance ever again ...
However, I fear as with all golden ages, this one will also not last and eventually they will try to pull a M$ on us ...
- First, vendors will start to lock down `internal' api's that give their own software an edge.
- Then they will prevent non-authorised applications from being installed.
- Eventually they will lock down the system so tight it returns to being a closed applicance.
- All the while they will use lawyers as anti-competitive weapons.
Ultimately however economics will force their hand, and any such tactics will prove too costly to maintain.
But what cost to society will such experiments first extract?
Update: Thanks Sankar, yes Nikon, too much Tomi on my brain that morning. And of course, Samsung have followed up with announcing their Android camera ... yum.
Maths to the rescue
I had a bit of a think about the expression I am evaluating and I noticed I could use logarithms to perform the calculation instead of multiplies. And actually, as I don't use the value itself other than as a threshold, the summation result can be used directly anyway - it just wont give as sharp peaks.
First, changed the inner loop to perform a summation of two possible values, in 16 bits. This removed the need for 32-bit masks, and the floating point multiplies (not that they were holding anything up). This took 2 classifiers down from 26 instructions to 18, and a test-case from 100 to 70ms. It also freed 3 quad registers but I haven't yet investigated whether this will let me do more (actually it will let me take the loop down to 16 instructions as I have 2 immediate loads in there).
However, this morning I had a closer look at the summation I now have.
r = sum m { testbit ? p : n } (1)
The bit testing code can't be further improved, but perhaps the select and sum can?
First, subtract n from the expression and move it outside of the select, and then separate the summation.
  r = sum m { (testbit ? (p - n) : 0) - n }
    = sum m { testbit ? (p - n) : 0 } - sum m { n }
    = sum m { testbit ? (p - n) : 0 } - mn             (2)
Which leaves with a slightly simpler internal summation and a constant. This expression can be implemented without a select instruction but since we have select in NEON it doesn't gain any instructions on it's own.
But this is where a neat trick of binary arithmetic comes in to play. Unlike C logic which uses 0 and 1 for false and true, the result of a bit test in SIMD code (and opencl c on vectors) is 0 for false, and ~0 for true. But in two's compliment signed binary, ~0 is also equal to -1.
So ... if the expression can be converted into a sum of -1's, then all one needs to do is directly add up the result of the bit tests, and avoid the select altogether. It is rather trivial to convert (2) into this form (if I have my summation identities on target anyway).
  r = sum m { (n-p) (testbit ? -1 : 0) } - mn
    = (n-p) sum m { testbit ? -1 : 0 } - mn
    = A sum m { testbit ? -1 : 0 } + B                 (3)
Where A and B are constants.
Actually there is another benefit here, as the summand is either 0 or -1 the range of the working sum is far more limited. Because of the size of the template I couldn't get away with 8 bit arithmetic without the danger of overflow - if I was using normal 8 bit two's complement arithmetic. But NEON to the rescue again, it has saturating instructions which will not overflow. It may still lead to a slightly incorrect answer - but i'm not interested in the absolute result but the relative one, and i think it should suffice.
I have yet to code this up, but if it works this will get the two-classifier case down to only 12 instructions - for 8 pixels. Less than one instruction per classifier per template, or about one when including the data loading as well.
And as this all now runs in double registers instead of quad registers, and I don't need n or p in the inner loop, it freeds up a whole swag of registers. These can be used to unroll more of the loop or share more of the data, for example by calculating more than 8 results per pass, more than one classifier at once, and so on. This might squeeze out a tad more juice out of it, but i'm not expecting much more here.
Update: So I coded it, it works. I'm calculating 32 locations at once, and there's still a good few registers free. Test case down from 70ms to 50ms.
Even better, I noticed the 'limited dual issue' capability of the NEON processor could be exploited in a couple of cases. Interleave the vtbl with some shifts: down to 43ms. Interleave the vqadd's with some vext's: down to under 41ms. Noice.
For comparison, an integer version in C (gcc, -O2) takes about 700ms.
Time for beer.
parallel 64 bit tests using NEON
So the next bit of code i've been working on requires a lot of 64-bit bit tests. Essentially using the tests as a 64-element 1-bit lookup table.
My first approach was to take an obvious C implementation, and convert it to NEON and perform the bit tests in parallel.
The C is basically like this:
  int i, count=0;
  for (i=0;i<N;i++) {
    uint64_t test = tests[i];
    uint64_t bit = (uint64_t)1 << bits[i];

    count += (test & bit) ? 1 : -1;
  }
It works, and one can perform the tests - but the tests need to be performed using 64-bit arithmetic - which takes a lot of register space, and a large amount of fuffing to get the data in the right format ('fuffing' is my technical term for data conversion/re-arrangement), and then the results must be converted back to 32-bits to form the selection masks.
So it's a great deal of code, much of which isn't doing anything but fuffing.
But the idea I had last night was to perform the testing using 8 bit values, and then scale these up to 32-bits to form the masks.
If one were writing the above code to avoid the 64-bit accesses in C, you could just use addressing to convert the 64-bit test to an 8 bit test - but on the correct byte instead.
  int i, count=0;
  for (i=0;i<N;i++) {
    int bitno = bits[i];
    uint8_t test = testsbyte[i * 8 + (bitno >> 3)];
    uint8_t bit = bitno & 7;

    count += (test & bit) ? 1 : -1;
  }
This requires per-byte addressing ... which you don't get for neon memory accesses per element ... except with vtbl.
So the following performs 8x 64-bit bit tests in only 5 instructions, and the actual tests are only using 8-bit arithmetic.
        @ d0 has 8 indices to test
        @ d1 has the 64-bit mask to test against
        @ d2 is set to 7 in 8 bytes
        @ d3 is set to 1 in 8 bytes

        vand.u8         d4,d2,d0        @ test & 7
        vshl.u8         d4,d3,d4        @ (1 << (test & 7))

        vshr.u8         d5,d0,#3        @ test >> 3
        vtbl.u8         d5,{d16},d5     @ data[test >> 3]

        vtst.u8         d4,d5           @ data[test >> 3] & (1 << (test & 7))
Changing the classifier to use code similar to this (but unrolled/scheduled better) gave me a 100% speed-up on the beagleboard (still unverified code ...).
Unfortunately, I still need nearly as many instructions just to convert the 8 bit mask into 32-bits for a selection mask (i need 32 bits for what i'm doing). But some mathematics might let me change that.
mipmap generation with SIMD/NEON
One part of the code i've been working on is building mipmaps so i can quickly generate non-aliased images at multiple scales.
This is an almost perfect fit for a SIMD processor, and in NEON it is no exception.
The simplest mechanism is successive averaging of a 2x2 blocks, and a simple C implementation which works ok is something like this:
void resample_1_2(uchar *src, uchar *dst, int sw, int sh) {
  int x,y;
  int dw = sw >> 1;

  for (y=0;y<sh;y+=2) {
    for (x=0;x<sw;x+=2) {
      uint v;

      v = (src[x+y*sw]
           + src[x+1+y*sw]
           + src[x+(y+1)*sw]
           + src[x+1+(y+1)*sw]) >> 2;

      dst[x/2+y/2*dw] = (uchar)v;
    }
  }
}
This can then just be called successively on the result from the previous run, until one reaches the desired depth.
This is easy to convert to SIMD, but some of the operations cannot be expressed in C or parallel variants, so it's easier just to show it in NEON. The only 'issue' to deal with is that NEON uses 8-byte memory accesses, but that isn't too difficult to cope with - we just produce at least 8 pixels at a time, i.e. 16 bytes input.
So the basic 1/2 downsample (actually it's 1/4) step is:
        @ Load 16x2 pixels
        vld1.u8         { d0, d1 },[r0],r1
        vld1.u8         { d2, d3 },[r0],r1

        @ Add horizontal adjacent pixels
        vpaddl.u8       q0,q0
        vpaddl.u8       q1,q1

        @ Add vertical adjacent pixels
        vadd.u16        q0,q1
        @ Average (/4)
        vshrn.i16       d0,q0,#2
        @ Output 8x1
        vst1.u8         { d0 }, [r2,:64],r3
The 'trick' here is the vpaddl instruction, which adds adjacent items in the vector and produces a result twice as wide, preserving all bits of precision. And the other trick is the vshrn instruction - shift right with narrow - which performs a shift and a cast to a half-sized result in one go.
The only problem with this is there just isn't enough work to do so the processor will be stalled some of the time. It also vastly underutilises the available resources. One obvious solution is just to go wider - take 32x2 pixels, and produce 16x1 results. A better solution is to go wider and deeper.
Since the data for the level above is already present in registers, one can save the memory load next time and just do the processing now. This can be extended as far as one has registers or as far as one wants to write specific custom code, but for me I just added another level.
So this is the final routine which takes a 32x32 pixel region, and generates two outputs: 16x16 1/2 downsampled, and 8x8 1/4 downsampled. Each loop generates 16x2 1/2 scaled results and 18x1 1/4 scaled ones - at full precision. (Actually again - these are 1/4 and 1/16 downsampled respectively since it does X and Y at 1/2 and 1/4 each, but you get the idea).
        @
        @ Rescale 32x32 bytes by 1/2 and 1/4
        @

        @ r0 = src
        @ r1 = width (stride)
        @ r2 = dst 1/2
        @ r3 = width/2 (stride)
        @ stack0 r4 = dst 1/4
        @ stack1 r5 = width/4 (stride)

        .global resample_12_14_neon

resample_12_14_neon:
        stmdb sp!, {r4-r6, lr}

        ldr     r4,[sp,#4*4]
        ldr     r5,[sp,#4*4+4]

        mov     r6,#8   @ for 32 input rows

1:      @ first 2 samples
        vld1.u8         { d0, d1, d2, d3 },[r0],r1
        vld1.u8         { d4, d5, d6, d7 },[r0],r1

        @ sum across
        vpaddl.u8       q0,q0
        vpaddl.u8       q1,q1
        vpaddl.u8       q2,q2
        vpaddl.u8       q3,q3

        @ sum down into 1/4 accumulation registers
        vadd.u16        q14,q0,q2
        vadd.u16        q15,q1,q3

        @ output 1/2 scale
        vshrn.i16       d0,q14,#2
        vshrn.i16       d1,q15,#2
        vst1.u8         { d0, d1 }, [r2,:64],r3

        @ Repeat for row 1
        vld1.u8         { d0, d1, d2, d3 },[r0],r1
        vld1.u8         { d4, d5, d6, d7 },[r0],r1

        vpaddl.u8       q0,q0
        vpaddl.u8       q1,q1
        vpaddl.u8       q2,q2
        vpaddl.u8       q3,q3

        vadd.u16        q0,q2
        vadd.u16        q1,q3

        @ Accumulate 1/4 scale
        vadd.u16        q14,q0
        vadd.u16        q15,q1

        vshrn.i16       d0,q0,#2
        vshrn.i16       d1,q1,#2
        vst1.u8         { d0, d1 }, [r2,:64],r3

        @ Generate 1/4 (1/16) scale
        vpaddl.u16      q14,q14
        vpaddl.u16      q15,q15

        vshrn.i32       d28,q14,#4
        vshrn.i32       d29,q15,#4

        vmovn.i16       d28,q14

        subs            r6,#1

        vst1.u8         { d28 }, [r4,:64],r5

        bhi             1b

        ldmfd sp!, {r4-r6, pc}
Of note perhaps is that the 1/4 result is generated in the high registers rather than use q4-q5. This is to honour the C ABI and avoid the need for saving these registers, only q4-q7 need to be saved.
It may be that the 32x32 access pattern is not ideal, and it requires appropriate padding/alignment of the mipmap levels, but I had more interesting things to look at so I didn't spend a lot of time on it.
One added benefit of doing the two levels at once is improved precision of the lower level since it doesn't use truncated intermediate results. For this reason it may be worth extending it to 3 levels, or 4 if registers allowed and the image stride restrictions weren't onerous. For VGA signals 3 levels of sub-sampling is adequate for what I need so it probably isn't worth going further than that.
Actually for this reason of precision, and the fact that I am usually down-sampling the scaled result from the mipmap, I decided the '2 row' version of the SIMD scaling routine would better suit my purposes. And the fact I had it already working helped ...
Classifier
So with all this I put together a timing routine for my classifier (I don't have the classifier itself setup yet/or debugged). The timing as usual depends a great deal on the scales one searches but, but when going from a scale of 0.207 to 0.333 in 6 steps (equating to an object width of 51 to 85 pixels for my 17x17 classifier), loading the mipmap, scaling to all the target scales and generating the LBPu2 codes takes about 5ms on the beagleboard-xm (image is 512x512). Which is pretty ok by me - even if I could squeeze a bit more out of it it's not going to be much.
The problem is now the classifier - when I turn that on it blows out to about 200ms (and most of that is at the smallest scale), or a pretty paltry 5fps (but of course, one must be-ware of timing on unverified code, it could be totally bogus). But I had a thought on that just before going to bed last night and I'm off to go see if i can't improve on that.
Copyright (C) 2019 Michael Zucchi, All Rights Reserved.
Powered by gcc & me!